[av_textblock size=” font_color=” color=” av-medium-font-size=” av-small-font-size=” av-mini-font-size=” av_uid=’av-jkwnggmb’ admin_preview_bg=”]

Welcome to the Support Center

Here you will find some helpful user guides as well as the ability to request support!

[/av_textblock]

[av_tab_section transition=’av-tab-slide-transition’ padding=’no-padding’ tab_pos=’av-tab-above-content’ content_height=’av-tab-content-auto’ tab_padding=’none’ initial=’1′ id=’tabcont’ av_element_hidden_in_editor=’0′ av_admin_tab_active=’1′ bg_color=” color=” av_uid=’av-jkxd0pbl’]

[av_tab_sub_section tab_title=’Request Support’ vertical_align=’middle’ icon_select=’icon_top’ icon=’ue8b4′ font=’entypo-fontello’ tab_image=” tab_image_style=” color=” background_color=” src=” attachment=” attachment_size=” background_attachment=’scroll’ background_position=’top left’ background_repeat=’no-repeat’ av_uid=’av-6rht7′]

[av_textblock size=” font_color=” color=” av-medium-font-size=” av-small-font-size=” av-mini-font-size=” av_uid=’av-jkxdg94m’ admin_preview_bg=”]

  • MM slash DD slash YYYY

[/av_textblock]

[/av_tab_sub_section][av_tab_sub_section tab_title=’Outlook – User Guide’ vertical_align=’middle’ icon_select=’icon_top’ icon=’ue805′ font=’entypo-fontello’ tab_image=” tab_image_style=” color=” background_color=” src=” attachment=” attachment_size=” background_attachment=’scroll’ background_position=’top left’ background_repeat=’no-repeat’ av_uid=’av-jkxcwmgh’]

[av_textblock size=” font_color=” color=” av-medium-font-size=” av-small-font-size=” av-mini-font-size=” av_uid=’av-jkxcx33w’ admin_preview_bg=”]

BASIC TASKS IN OUTLOOK

Outlook organizes your emails, calendars, contacts, tasks, and to-do lists, all in one place. That organization starts with your email account. From there you can start working with emails, turning them into tasks or appointments, and storing information about the people you interact with in your contacts so that you never have to remember an email address or a phone number. Let’s take a quick walk-through of some basic tasks.

GET STARTED

Your first action is to set up your Outlook account. After that, you’ll be ready to start receiving and sending email, use the calendar, create contacts, and work with Outlook tasks.

Setup is automatic if you used an earlier version of Outlook on the same computer. If you didn’t, the Auto Account Setup will start the first time you start Outlook and walk you through the process.

You’ll be asked for your name, email address, and a password. That’s usually enough, but if automatic setup fails, Outlook will ask for a few more pieces of information, such as your mail server name. If you don’t have that info, your email provider can give you the details.

Add Account button in the Backstage view

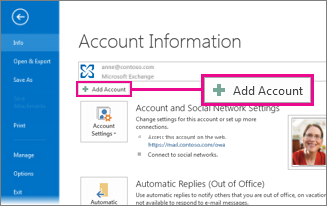
Note: If you want to add another email account later, when you’re ready choose File > Add Account to start Auto Account Setup.

Quick access bar

The quick access bar is an important part of your Outlook experience. And it’s an easy way for you to move among the top Outlook features—Mail, Calendar, People, and Tasks. The bar is in addition to the standard tabs and ribbons that provide you with an assortment of tools and options to help you use and manage Outlook.

Typically located at the bottom of the Outlook window, the quick access bar shows—depending on selected settings—either button names (left image) or icons (right image) associated with feature names.

Outlook quick access bar showing, by name, Mail, Calendar, People, and Tasks buttons, and More (the three dots or ellipses) options Outlook quick access bar showing Mail, Calendar, People, Tasks, and More options icons

Change what appears on the quick access bar

You can control which buttons (or icons) appear on the quick access bar and even in what order they appear.

  1. Choose More > Navigation Options.Choose More (the three dots) on the quick access bar to view navigation options
  2. In the Navigation Options dialog box, do the following:Quick access bar Navigation Options dialog box
    • To change the number of buttons or icons that appear on the bar, increase or decrease the default setting of 4 for Maximum number of visible items.
    • To view icons instead of names, select the Compact Navigation check box.
    • To rearrange how buttons or icons are listed, select an item in the Display in this order box, and then choose Move Up or Move Down.
  3. Choose OK.

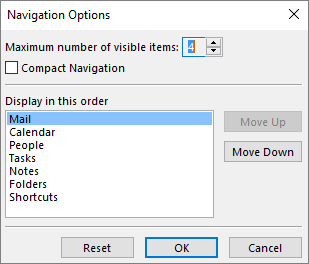
    Tip: If you don’t like the changes you made, or just want to start over, choose Reset.

MAIL

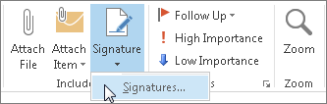
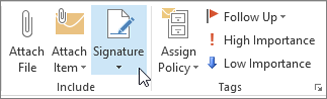
Email connects you to people inside and outside your organization. You can add an electronic signature and attachments to your email messages.
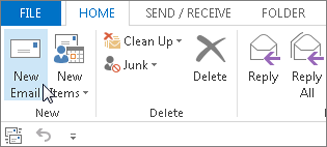
Create a new email message

  1. From any mail folder (such as your Inbox), choose New Email.New emailKeyboard shortcut:    To create an email message, press Ctrl+Shift+M.
  2. When you’re done composing your email, choose Send.

Add an email signature to messages

Create personalized signatures that appear at the bottom of your messages. Signatures can include text, images, your Electronic Business Card, a logo, or even an image of your handwritten signature.

Create a signature

  1. In a new message, choose Signature >Signatures.Signature
  2. On the Email Signature tab, choose New.
  3. Type a name and then choose OK.
  4. Under Choose default signature, do the following:
    • In the E-mail account list, choose an email account to associate with the signature.
    • In the New messages list, choose the signature that you want to be added automatically to all new email messages. If you don’t want to auto sign your email messages, you can ignore this option as (none) is the default value.
    • In the Replies/forwards list, choose the signature that you want to be added automatically (auto sign) when you reply to or forward messages. Otherwise, accept the default option of (none).
  5. Under Edit signature, type the signature, and then choose OK.

Add a signature

  • In a new message, choose Signature, and then choose the signature that you want.Signature

Forward or reply to an email message

  1. On the ribbon or in the reading pane, choose Reply, Reply All, or ForwardReply to the message
  2. In the To, Cc, or Bcc box, do one of the following:
    • To add a recipient, click in the appropriate box and enter the recipient’s name.
    • To remove a recipient, click in the appropriate box, choose the recipient’s name, and then press Delete.

Add an attachment to an email message

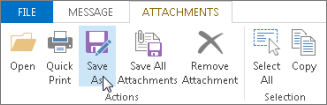
To share a file, you can attach it to your message. You can also attach other Outlook items, such as messages, contacts, or tasks.

  1. Create a new message, or choose an existing message and choose Reply, Reply All, or Forward.
  2. In the message window, choose Message > Attach File.Attach file to a message

Open or save an email message attachment

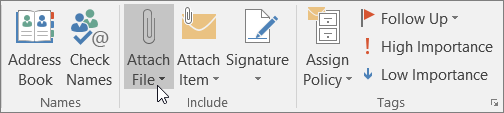
You can open an attachment from the reading pane or from an open message. After opening and viewing an attachment, you can save it. If a message has more than one attachment, you can save them as a group or one at a time.

Open an attachment

Depending on the version of Outlook you’re using, there might be multiple options available to open an attachment.

  • Double-click the attachment.

Save an attachment

  1. Choose the attachment in the reading pane or the open message.
  2. On the Attachments tab, in the Actions group, choose Save As. You can also right-click the attachment, and then choose Save As.Save as attachments

Create a calendar appointment

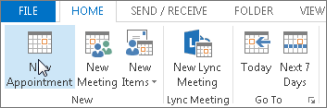
In Outlook, appointments aren’t the same as meetings. Appointments are activities that you schedule in your calendar that don’t involve inviting other people or reserving resources, such as a conference room or equipment.

Click Calendar

  • In a Calendar folder, choose New Appointment. You can also right-click a time block in your calendar grid, and then choose New Appointment.Calendar new appointmentKeyboard shortcut:    To create an appointment, press Ctrl+Shift+A.

Schedule a meeting

In Outlook, a meeting includes other people and can include resources such as conference rooms. You’ll get responses to your meeting requests in your Inbox.
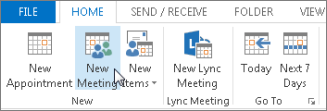
  • In a Calendar folder, choose New Meeting.Calendar new meeting

Keyboard shortcut:    To create a new meeting request from any folder in Outlook, press Ctrl+Shift+Q.

Set a reminder

Reminders pop-up in an alert window so you don’t miss an important deadline. You can set or remove reminders for almost anything in Outlook, including email messages, appointments, and contacts.

For appointments or meetings

  • Open an Appointment or Meeting, and then in the Reminder list box, choose the amount of time before the appointment or meeting when you want the reminder to appear. To turn off a reminder, choose None.

For email messages, contacts, and tasks

  • Choose Follow Up > Add Reminder.

Tip:  You can quickly flag email messages as to-do items by using reminders. These reminders make the message appear on the To-Do List and in the Tasks folder, but doesn’t automatically add a reminder. Right-click the flag in the message list to add a reminder. Or, if you have the message open, choose Follow Up > Add Reminder.

Follow up

PEOPLE

People is the bucket name for those persons—and companies—who form your business and personal contacts. Who you add as a contact is completely discretionary and the only restrictions that might apply as to who you can or can’t add are the limitations that you or your company impose. Your company, for example, might have rules about correspondence with certain external email addresses.

Create a contact

A contact can be as simple as a name and email addresses, or you can include, for example, details such as street addresses, multiple phone numbers, a picture, and birthdays. You’ll find your Contacts under the People option in the shortcuts bar in the lower-left corner of the Outlook window.
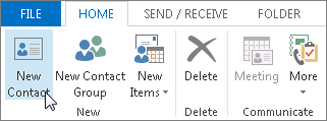
People

  • In People, choose New Contact.New ContactKeyboard shortcut:    To create a contact from any folder in Outlook, press Ctrl+Shift+C.

Get a list of the contacts in your Outlook address book

Saving a copy of contacts in your address book is a good practice. In Outlook 2013 or Outlook 2016 for Windows, you can download a comma-separated value (.csv) file of your contacts to your device and open it in Excel.

  1. Open Outlook, choose File > Open & Export > Import/Export.Choose Open & Export, and then choose Import/Export.
  2. In the Import and Export Wizard, choose Export to a file > Next.
  3. Choose Comma Separated Values and then, on the Export to a File page, choose Contacts as the folder to export from for your account.Scroll up and then choose the contacts folder you want to export.

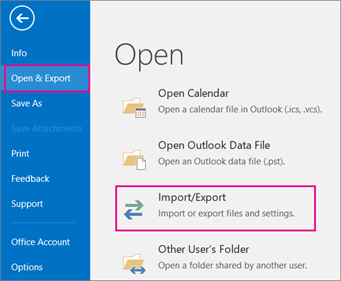
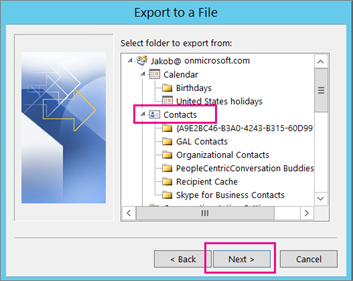
    Important: Before proceeding, make sure the Contacts folder you choose is attached to your email account. This is especially important if you’re carrying out these steps from another person’s computer.

  4. Choose Next > Browse, and then go to the location where you want to store the comma-separate values (.csv) file.
  5. Type a file name, and then choose OK > Next.Save your contact address book as a .csv file
  6. Choose Finish to start the export process.

    Note: Outlook doesn’t display a message when the export process is complete.

Open your contact .csv file

The comma-separated value (.csv) file of your exported contacts typically is opened in Excel.

  1. Browse to the location where you saved the .csv file and open it.
  2. Confirm your contacts are listed in the file.Example of Outlook .csv file opened in Excel

    Note: There might be empty cells. It’s normal.

  3. Close the file without making any changes to avoid potential problems importing the file on a different device that has the same version of Outlook or a different email service.

TASKS

Create a task

Many people keep to-do lists—on paper, in a spreadsheet, or with a combination of paper and electronic methods. In Outlook, you can combine various lists into one, get reminders, and track task progress.

  1. Open Outlook, and on the Home tab, in the New group, choose New Items.
  2. Choose Task, fill in the task form as needed, and then choose Save & Close.

Keyboard shortcut:    To create a new task, press Ctrl+Shift+K.

Assign a task

  1. Choose Tasks icon on Outlook quick access bar on the quick access bar or Tasks on the navigation bar.
  2. Do one of the following:
    • Choose New task icon on the ribbon or press Ctrl+Shift+K to create a task.or
    • Open an existing task.
  3. Choose Assign Task.Assign task command on the ribbon
  4. In the task form, do the following:
    • In the To box, enter a name or an email address.
    • Add a Subject, choose a Start date and Due date, and set Status and Priority as needed.Start and Due Dates properties for an assigned task
    • Accept or clear the default selection of the two check boxes: Keep an updated copy of this task on my task list and Send me a status report when this task is complete.
    • If needed, type a message in the content block below the check boxes.
  5. If you want the task to repeat, choose Recurrence on the ribbon, select the options you want in the Task Recurrence dialog box, and then choose OK.

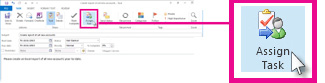
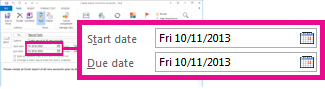
    Note:  If you assign a recurring task, a copy of the task remains in your task list, but it never updates. If you select the Send me a status report when this task is complete check box, you receive status reports for each completed occurrence of the task.

  6. Choose Send.

Tip: Outlook can track the progress of a task assigned to one person. If you want multiple people to work on a task, divide the task into smaller pieces or assign each task individually. For example, to track a report to be written by three writers, create three separate tasks and assign each individual task to the appropriate writer.

Accept or decline an assigned task

When a task is created and assigned to you, it appears in your Inbox.
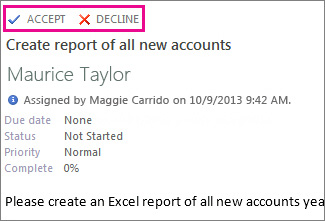
Accept and Decline commands in a task request viewed in the Reading Pane

  • In the reading pane, choose Accept or Decline.orOpen the task, choose Accept or Decline on the ribbon, and regardless of the option you chose, select either Edit the response before sending or Send the response now, and then choose OK.

    Note: Accepted tasks appear in your Outlook task list.

If you open a task, you can Reply, Reply all, or Forward to the person who assigned the task to you and to others as appropriate. You also can include a comment in the message block.

View a task

  1. Open Outlook, and on the quick access bar, choose Tasks icon on Outlook quick access bar .
  2. In your To-Do List or Tasks list, double-click an item to view the full form.

You can change how you view tasks at any time.
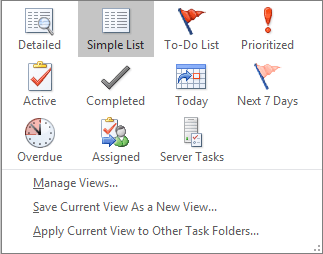
  • On the Home tab, in the Current View group, choose a different view.Current view options for tasks .

Print a task

You can choose how you view your tasks, and then, based on what you choose to print, in what format—Table Style or Memo Style—the task is printed. If you select a single task to print, for example, then the only print setting available is Memo Style. But if you choose a list such as the To-Do List, a Table Style print format also is offered.

  1. Choose Tasks icon on Outlook quick access bar on the quick access bar.Outlook quick access bar
  2. Choose a single task in one of your folders—To-Do List or Tasks list—or choose a folder.
  3. Choose File > Print and select the format (if available) under settings.

PRINT AN EMAIL MESSAGE, CONTACT, OR CALENDAR ITEM

In Outlook, you can print items such as email messages, contacts, calendar items, or larger views, such as calendars, address books, or content lists for Mail folders.

  1. Choose an item or folder in Outlook that you want to print.
  2. Choose File > Print.

Print

[/av_textblock]

[/av_tab_sub_section][av_tab_sub_section tab_title=’Gmail – User Guide’ vertical_align=’middle’ icon_select=’icon_top’ icon=’ue8f6′ font=’entypo-fontello’ tab_image=” tab_image_style=” color=” background_color=” src=” attachment=” attachment_size=” background_attachment=’scroll’ background_position=’top left’ background_repeat=’no-repeat’ av_uid=’av-jkxcxipi’]

[av_textblock size=” font_color=” color=” av-medium-font-size=” av-small-font-size=” av-mini-font-size=” av_uid=’av-jkxcy3yz’ admin_preview_bg=”]

OPEN GMAIL:

  • Go to mail.google.com from any web browser.
  • Install the Gmail app for Android.
  • Install the Gmail app for Apple® iPhone® or iPad®.
What can you do with Gmail
1

CREATE AND SEND EMAIL

Learn the basics of creating, sending, viewing, and replying to email.

In this section, you learn how to:

1.1

Create and send email

  1. Open your Gmail inbox.
  2. In the left sidebar, click

    Compose

    .A new email opens.

  3. (Optional) Change your window using the buttons in the upper corner.
  4. Add recipients and a subject.
  5. Enter your message.Email you start writing but haven’t sent are automatically saved inDrafts on the left sidebar.
  6. (Optional) Add attachments attach_file, links link, images image, and more.
  7. Click Send.

Tip: To unsend an email, at the bottom of the window, click Undo. This option appears briefly, but you can change how long it lasts.

None
1.2

See new email

Unread email are bold. To open an email, click it.

By default, replies to email are grouped into conversations. Keeping all email together in a thread makes it easier to keep track of them and saves space in your inbox.

If you prefer to separate your existing email from future email, you can turn off conversation view.

Turn off conversation view:

  1. In the top right, click Settings settings > Settings.
  2. In the General tab, scroll to Conversation View and select Conversation view off.
  3. At the bottom, click Save Changes.

Tip: To get more space for your email, you can close the left panel by clicking Menu menu.

None
1.3

Reply to email

  1. To reply to a single email or the last email in a thread, click
    reply Reply

    .

  2. To reply to an email within a thread, click Reply reply.
  3. To forward a single email or the last email in a thread, click
    forwardForward

    .

  4. To forward an email within a thread, click More more_vert > Forward.
  5. To see previous email in a thread, click Show trimmed content .
  6. To forward an entire conversation, at the top, click More more_vert > Forward all.
  7. To use a Smart Reply, at the bottom of the email, click a suggested reply. You can then edit the email before sending it.

Tip: You might see existing email at the top of your inbox with a suggestion to reply or follow up. To hide these suggestions, click Settings settings > Settings, go to Nudges and uncheck the boxes.

None
1.4

Change recipients

Add and remove recipients: 

  1. From an open email, click a recipient’s address.
  2. To add more recipients, type their email addresses.
  3. To remove recipients, next to their email address, click Remove close.

Change an email subject:

  1. Next to Type of response reply, click the Down arrow arrow_drop_down > Edit subject.
  2. Type a new subject.
None
1.5

Save and print attachments

When someone sends you an attachment, such as a photo or document, you see a preview of the attachment in the email.

  • See a full-screen view and print: Click the attachment to open a full-screen view. To print, click Print print.
  • Download an image or save it to Drive: Point to the preview and click Download file_download or Save to Drive drive_file_stream.
None
1.6

Email without an internet connection

Chrome browser only

Use Gmail offline to read, respond to, and search your Gmail messages when you aren’t connected to the internet. Any email you write, archive, label, or delete while you’re offline will be sent or moved when you’re back online.

When you enable Gmail offline on a device, your messages sync with the browser’s storage on the computer you’re using. Enable Gmail offline on each device for which you want offline access.

Enable Gmail offline:

  1. In the top right, click Settings settings > Settings.
  2. Go to the Offline tab and check the Enable offline mail box.
  3. (Optional) Next to Sync settings, choose how many days of email you want to store offline.
  4. Next to Security, choose whether to keep or remove offline data on your device.
    If you don’t see this option, it might be set by your G Suite administrator.
  5. Click Save Changes.

Note: If you don’t see the Offline option, it might not be enabled for your organization. See your G Suite admin.

None
2

ORGANIZE YOUR INBOX

Manage email with labels and filters and move email out of your inbox.

In this section, you learn how to:

2.1

Switch to labels from folders

In other email programs, you might have stored email in folders. In Gmail, you use labels to categorize your email. Labels are like folders, but with a twist—you can apply several labels to an email, then later find the email by clicking any of its labels from the left panel.

You can also:

  • Open a label in the left sidebar to see all email with that label.
  • Nest labels within labels.
  • Search for all email with a label.
  • Set up your inbox as you prefer:
    • See labels on email in your inbox to quickly identify different types of email.
    • Auto-archive email to route it away from your inbox, as you did with rules and folders.
None
2.2

Create labels

  1. Create a label:
    1. In the top right, click Settings settings and select Settings.
    2. Click the Labels tab.
    3. Scroll to the Labels section and click Create new label.
    4. Enter the label name and click Create.You can also create nested labels, which are like subfolders.
  2. Create a label from an email:
    1. From an email, click Labels label > Create new.
    2. Enter the label name and click Create.
    3. (Optional) Click Nest label under and choose an existing label to place it under.The new label automatically applies to your email.
None
2.3

Apply labels

  1. Apply labels to email:
    1. In your inbox, check the boxes next to the email you want to apply a label to.
    2. Click Labels label.
    3. Check the boxes next to the labels you want to add and clickApply.
  2. Add a color to a label:
    1. In the left panel, point to a label and click More more_vert.
    2. Point to Label color and choose a color. Or, click Add custom color.The change instantly applies to all email with that label.
    3. (Optional) To remove a label color, point to Label color and click Remove color.
    4. (Optional) To see all email with a particular label, in the left panel, click the label’s name.
  3. Move email from your inbox to a label:Move email out of your inbox to labels the same way you did with folders.
    1. In your inbox, check the boxes next to the email you want to move into a label.
    2. Click Move to drive_file_move.
    3. Click the label you want to move your email to.
None
2.4

Add filters

Manage your incoming email automatically with Gmail’s filters.

  1. In the Gmail search box, click the Down arrow arrow_drop_down.
  2. Enter your search criteria, then click Create filter.
  3. Check the Apply the label box and choose a label to automatically sort incoming email fitting your search criteria.
  4. (Optional) If you’d like email fitting your search criteria to be automatically moved out of your inbox, but want to be able to access them later, check Skip the Inbox (Archive it).
  5. Click Create filter.
None
2.5

Star important email

Want to flag an important email? Click Star star_border next to an email in your inbox or an email within a conversation.

To see all your starred email, in the left sidebar, click Starred.

None
2.6

Snooze email

Postpone email to a future date or time that’s more convenient for you.

  1. Point to an email.
  2. On the right, click Snooze watch_later.
  3. Under Snooze until, choose a time.The email automatically snoozes and moves out of your inbox.
  4. (Optional) To see all snoozed email, click Snoozed in the left sidebar.
None
2.7

Archive or delete email

Archived email move out of your inbox but stay under All mail, so that you can find them later. Deleted email move to the Trash and get permanently deleted after 30 days.

To archive or delete email, select one or more email. At the top, click Archive archive or Delete delete. Or, you can point to a single email and click Archive archive or Delete delete.

None
3

FIND EMAIL

Search your inbox to find the email you need.

In this section, you learn how to:

3.1

Search your inbox

To search for keywords, type the word you’re looking for into the search box. Gmail suggests search terms as you type. Click a suggestion or click Search search.

None
3.2

Narrow your search

To narrow your search, at the right of the Gmail search box, click the Down arrow arrow_drop_down.

Add specific search criteria. For example, you can find an email from Alicethat has an attachment within a particular time frame.

None
4

CREATE SIGNATURES

Automatically add a professional email signature to email you send.

In this section, you learn how to:

4.1

Create a signature

Your signature can include your name, title, and contact information.

  1. Click Settings settings and select Settings.
  2. On the General tab, scroll down to the Signature section and create your signature.
  3. (Optional) Use the format bar to add text colors, styles, links, or a picture.
  4. At the bottom, click Save Changes.
None
5

ACCESS YOUR CALENDAR, NOTES, AND TASKS

See your schedule, reply to invitations, and keep track of your to-do lists without leaving Gmail.

Note: If you don’t see the Calendar, Keep, and Tasks icons on the right, they might not be enabled for your organization. Talk to your G Suite admin.

In this section, you learn how to:

5.1

Open your Google Calendar and events

  • Open Calendar: On the right, click Calendar Calendar.Your daily events and a mini monthly calendar appear.
  • See event details: Click an event to open it and see details.
  • Reply to an event: Open an event. At the bottom, next to Going?, click a reply.

To do more with Calendar, see Get started with Calendar.

None
5.2

Open notes in Google Keep

  • Open Keep: On the right, click Keep Keep.
  • Add a note or list: Click + Take a note or New list format_list_bulleted.
  • Edit a note: Click a note and enter a message. Click Done.

To do more with Keep, see Get started with Keep.

None
5.3

Open your to-do lists in Google Tasks

  • Open Tasks: On the right, click Tasks Tasks.The current list appears at the top, with any tasks below it.
  • Add a new list: Click the Down arrow arrow_drop_down > Create a new list.
  • Change lists: Click the Down arrow arrow_drop_down and select a list.
  • Add a new task: Click + Add a task. To add a new task from an email, drag the email into a task list.
  • Edit or delete a task: Point to a task and click Edit create. From the Edit window, click Delete delete to delete a task.
None

[/av_textblock]

[/av_tab_sub_section][av_tab_sub_section tab_title=’Office 365 – Android Setup’ vertical_align=’middle’ icon_select=’icon_top’ icon=’ue91c’ font=’entypo-fontello’ tab_image=” tab_image_style=” color=” background_color=” src=” attachment=” attachment_size=” background_attachment=’scroll’ background_position=’top left’ background_repeat=’no-repeat’ av_uid=’av-jkxcylv3′]

[av_textblock size=” font_color=” color=” av-medium-font-size=” av-small-font-size=” av-mini-font-size=” av_uid=’av-jkxcz3i0′ admin_preview_bg=”]

After you set up your Office 365 email account, set it up on your Android device using your native email app.

 Note: You can also access your Office 365 email through the Microsoft Outlook app.

 Note: There are many different versions of Android. We document the base version released by Google, so your device might have a slightly different set of fields.

  1. Tap Settings.
  2. Tap Accounts.
  3. Tap Add Account.
  4. Tap Microsoft Exchange ActiveSync or Corporate.
  5. Enter your Email address and Password.
  6. If you see a Domain\Username field, enter your full email address.

     Note: If Domain and Username are separate fields, enter your full email address in Username, and leave Domain blank.

  7. If you see a Server field, enter outlook.office365.com.
  8. Tap Next.
  9. To complete auto configuration, tap Ok.
  10. Select the Account options you want to use. Selecting a longer sync period will show you more calendar information and email, and require more memory.
  11. Tap Next.
  12. Tap Microsoft Exchange ActiveSync, to see the display name for your email account. You can change the display name, here.
  13. Tap Next, and you will see your inbox.

Your Office 365 email is now set up in your Android native mail app. To make sure you can send messages, compose an email and send it to yourself.
[/av_textblock]

[/av_tab_sub_section][av_tab_sub_section tab_title=’Office 365 – IPhone Setup’ vertical_align=’middle’ icon_select=’icon_top’ icon=’ue920′ font=’entypo-fontello’ tab_image=” tab_image_style=” color=” background_color=” src=” attachment=” attachment_size=” background_attachment=’scroll’ background_position=’top left’ background_repeat=’no-repeat’ av_uid=’av-jkxczkm8′]

[av_textblock size=” font_color=” color=” av-medium-font-size=” av-small-font-size=” av-mini-font-size=” av_uid=’av-jkxd05dx’ admin_preview_bg=”]

SET UP AN OFFICE 365, EXCHANGE, OR OUTLOOK.COM EMAIL IN THE IOS MAIL APP

Step 1
greyline
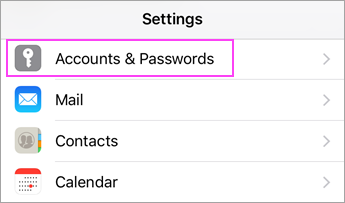
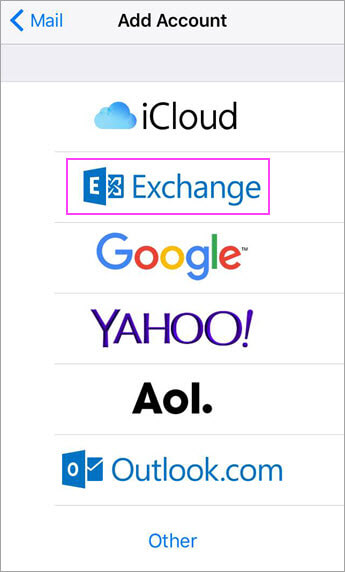
Go to your iPhone or iPad’s Settings > scroll down and tap Accounts & Passwords > Add Account.

Note: If you’re on iOS 10, go to Mail > Accounts >Add Account.

Device Settings > Accounts & Passwords

Tap

Step 2
greyline
Select Exchange.

Choose Exchange

Step 3
greyline
Enter your Office 365, Exchange, or Outlook.com email address and a description of your account. Tap Next.

Exchange Sign In

Tap Sign In.

Tap Sign In if using O365 or tap Configure Manually if you have your organization's server settings.

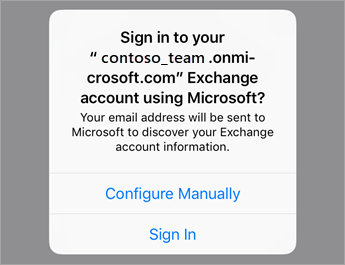
Note: Tap Configure manually if you need to enter server settings.

Step 4
greyline
Enter the password associated with your email account. Tap Sign in or Next.

Enter your O365 work or school account password.

Step 5
greyline
The Mail app may request certain permissions. Tap Accept.

Tap Allow if prompted to give permission.

Step 6
greyline
Choose the services you want to sync with your iOS device and tap Save. You’re done!

Account sync settings

[/av_textblock]

[/av_tab_sub_section][av_tab_sub_section tab_title=’Gmail – Setup Android’ vertical_align=’middle’ icon_select=’icon_top’ icon=’ue91c’ font=’entypo-fontello’ tab_image=” tab_image_style=” color=” background_color=” src=” attachment=” attachment_size=” background_attachment=’scroll’ background_position=’top left’ background_repeat=’no-repeat’ av_uid=’av-jky767ps’]

[av_textblock size=” font_color=” color=” av-medium-font-size=” av-small-font-size=” av-mini-font-size=” av_uid=’av-jky77z6l’ admin_preview_bg=”]

  1. On your Android phone or tablet, open the Gmail app Gmail.
  2. In the top left, tap Menu Menu.
  3. To the right of your username, tap the Down arrow Down Arrow.
  4. Tap Add account.
  5. Choose the type of account you want to add.
    • If you use Office 365, select Exchange and Office 365.
    • If you check work or school emails through Outlook for Windows, select Outlook, Hotmail, and Live.
    • If you don’t see your email service, select Other.
  6. Follow the steps on the screen to add your account.

[/av_textblock]

[/av_tab_sub_section][av_tab_sub_section tab_title=’Gmail – Setup IPhone’ vertical_align=’middle’ icon_select=’icon_top’ icon=’ue920′ font=’entypo-fontello’ tab_image=” tab_image_style=” color=” background_color=” src=” attachment=” attachment_size=” background_attachment=’scroll’ background_position=’top left’ background_repeat=’no-repeat’ av_uid=’av-jky76u62′]

[av_textblock size=” font_color=” color=” av-medium-font-size=” av-small-font-size=” av-mini-font-size=” av_uid=’av-jky790zz’ admin_preview_bg=”]
You can add both Gmail and non-Gmail accounts to the Gmail app.

  1. Make sure you’ve downloaded the Gmail app.
  2. On your iPhone or iPad, open the Gmail app Gmail.
  3. In the top left, tap Menu Menu.
  4. To the right of your username, tap the Down arrow Down Arrow.
  5. Tap Manage accounts and then Add account.
  6. Choose the type of account you want to add.
    • If you use iCloud, @me.com, or @mac.com accounts, you might need to enter specific settings and an app password.
    • If you check work or school emails through Outlook for Windows, select Outlook, Hotmail, and Live.
    • If you don’t see your email service, select Other.
  7. Follow the steps on the screen to add your account. If available, tap Try Gmailify to get Gmail features with your added account, like spam protection and email categories.

[/av_textblock]

[/av_tab_sub_section][/av_tab_section]